What is Setlist Maker?
Building setlists manually is a bit of a hassle, and you can get things badly wrong when not typing the correct file names, so I built a tool to help with that. The original tool was called “Setlist Builder”, and it always felt a bit clunky to me, so in 2024 I decided to re-build it completely, using the Flutter platform (the one LivePrompter 2 is also built on). This also means that Setlist Maker is now available for Windows AND macOS.
SetlistBuilder is an app that uses LivePrompter’s home directory to build setlists using a graphical interface. It scans your LivePrompter song files for useful information for setlist building and saves the finished setlists to your LivePrompter setlist directory, so they are instantly available in LivePrompter.
SetlisBuilder also allows you to sub-divide your setlist into individual blocks (sets) and aggregates play times for each individual set, as well as for the whole setlist.
Following the LivePrompter philosophy: “edit on the desktop, view on any platform”, Setlist Maker is built exclusively for desktop platforms (Windows and macOS), since these can directly access the files in your file system without the need for synchronizing through Dropbox. So please don’t ask for an Android or iOS version…
Since this is just a companion tool to LivePrompter, I won’t explain any of the fundamental basics here – I assume you already use and know LivePrompter, so no need to explain what a song file or a song directory is – OK?
Installation
To install Setlist Maker, simply run the correct Installer you downloaded from the “Download” page. You’ll need to scroll down a bit to “Tools & Companion Apps”.
The Windows installer will simply do its thing; it will also create a desktop icon to launch Setlist Maker.
On a Mac you need to mount the downloaded .dmg file by double-clicking and then drag the Setlist Maker icon to the “Applications” folder in the window that appears. Then you can find and launch it as any other macOS app.
Note: Since LivePrompter isn’t distributed via the Apple AppStore, macOS may complain “Setlist Builder cannot be opened because Apple cannot check it for malicious software. This software needs to be updated. Contact the developer for more information.”. In this case, you’ll need to override Privacy & Security settings to allow Setlist Builder to be started. See this Apple Knowledge Base Article on how to do this.
Once you’ve installed Setlist Maker, launch it and take your first steps through the initial configuration.
Initial Configuration
When starting, Setlist Maker doesn’t know yet where your LivePrompter song files live, so the first step is to tell it. So click on the “hamburger menu” at the top left of the window, then select “Settings” in the drawer that pops out. You’ll be faced with the Settings page. We’ll get to the details later; for now, you’ll need to look at the “Sources” section. This is where you can define multiple locations for song files (useful if you manage setlists for different bands/projects). Currently, there is only one source defined, called “Default”, and the path to its song files isn’t set yet:

To set the path, click on the “pencil” icon for the Default source and enter the details in the box that launches:

You can either type the path to your songs into the “Path” box, or you can use the blue “…” button to open a file selector dialog that will help you navigate the correct path to your song files. Then hit “OK” and your path is set. Once you get back to the main screen (click the “left arrow” in the title bar), you should see your songs on the left side of the window.
The Main Window
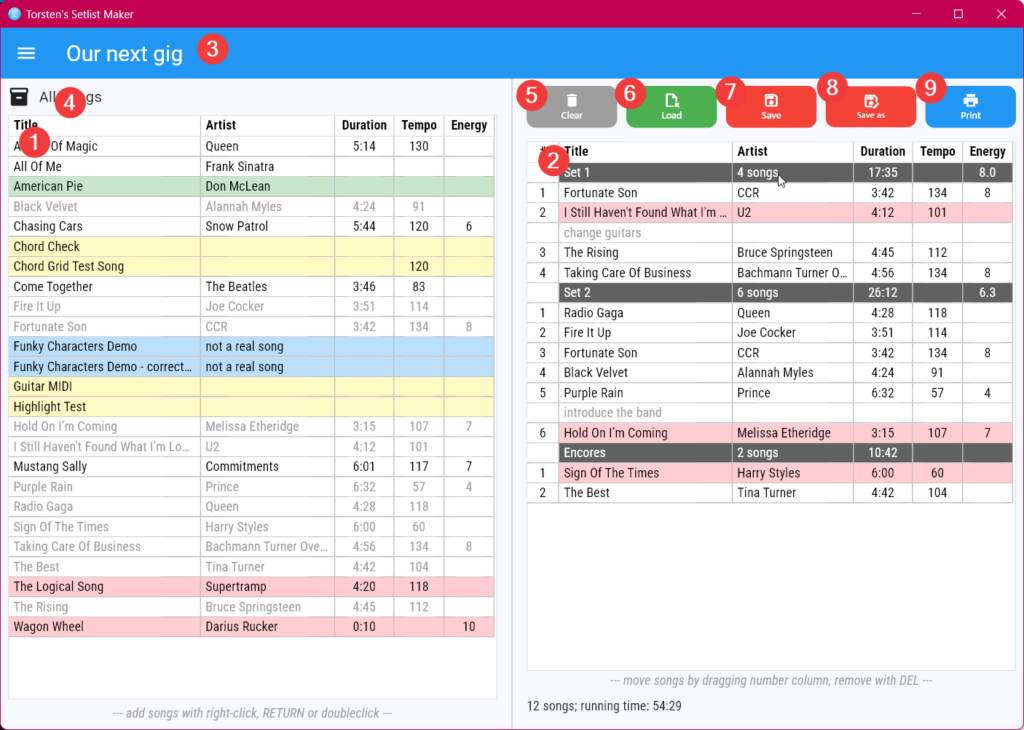
This is the main window of Setlist Maker. I’ve resized it up a bit from the original (minimal) size, so that everything is more readable…

Your Song Material
On the left side (1), you see all the songs in your LivePrompter directory. Using the drop-down menu at the top (4), you can display subsets of the full file lists; select books (if you have defined books in your LivePrompter songs using the {book:xxx} tag) or existing setlists to only display songs contained in them.
The information shown is extracted from the tags in your LivePrompter song files, so be sure you use the {title:…}, {artist:…}, {duration:…} and {tempo:…} tags; also if you want to organize your repertoire, it’s useful to use {book:…} tags to assign songs to one or multiple “songbooks”.
To add a song to the setlist on the right (2), you can either double-click it, right-click it (or Control-click on the Mac) and click “Add to list” in the context menu. Or you can select it by clicking and then press “Return” on your keyboard. The song will now be appended to the current setlist on the right. Sorry, it will always be added at the end – if you want it elsewhere, you’ll have to move it afterwards.
You can use the usual keyboard modifiers for selecting multiple songs – CTRL-click (Command-click on Mac) to select multiple individual songs or SHIFT-click to select a range of consecutive songs. When multiple songs are selected, use “Return” or the right-click menu to add them; double-clicking is better for adding one song at a time.
Pro-tip: to un-select everything quickly, just hit the ESC-Key on your keyboard.
To help fing the right songs quickly, you can change the order of the songs on the left side by clicking one of the column headers “Title”, “Artist”, “Tempo” and “Energy” – sorting by duration doesn’t seem so useful. With “Tempo” and “Energy”, you can toggle between ascending and descending order by clicking repeatedly.
The Setlist
The right side of the window shows the setlist being edited. Its name is shown at the top in the blue title bar (3). You move songs up and down the order by dragging them with the mouse – click and drag them where you want them. Simple as that!
To remove songs from the setlist, select them and either use the right-click menu (“Delete”) or hit the “Del” key on your keyboard. For consistency reasons (‘double-click means “add”‘), I’ve decided against using double-click to remove songs, but if you want to be fancy, you can hold ALT on your keyboard (Option on Mac) and double-click to remove songs.
Dividers are entries to structure your setlist into sets. You create them by right-clicking a setlist entry and selecting “Add divider…”, then typing its title. You can edit it by right-clicking and selecting “Edit…”. Dividers will display a count of the songs below them up to the next divider (or end of setlist) and will sum up the playing time ({duration:…} tags). Pretty helpful when creating sets.
Dividers will be saved in a setlist in the format “--- Divider Title ---”. When entering dividers in Setlist Maker, there is no need to type the three hyphens; simply enter the title (SetlistBuilder will create the hyphens automatically in the generated .txt file). When loading a setlist, LivePrompter and Setlist maker will recognize dividers based on this formatting.
Instructions are playlist entries to help structure a gig (“tell a dirty joke here”, “Joe to change to a different guitar”, “Fred: announce next song”). Similar to dividers, instructions are formatted as “- Instruction -“ in the setlist file. As for dividers, you don’t need to enter the hyphens in Setlist Maker – it will add them automatically.
LivePrompter will display dividers and instructions as single-page songs, just in a different color.
Also, dividers and instructions can have some lines of content that will be displayed in LivePrompter when you get to that point in the setlist. You can enter that content in the “Comments” box when creating or editing dividers / instructions. This can be useful in some situations where you just want to add some information specific to one gig, e.g. add “be sure to start exactly at 8 p.m.” to the “Set 1” divider or to put the names of guest musicians in the “introduce the band” instruction, so you don’t mess up…
Note: the comments of dividers and instructions will not be line-wrapped by LivePrompter, so be sure that you do break your lines manually in the Comments box.
Saving and Loading
Since setlist files are always stored in the “setlist” subdirectory of your LivePrompter, there’s no fancy file dialog here when clicking the “Load” (6) and “Save” (7) buttons. Just a simple list pop-up menu of the setlists already existing in your setlists directory for loading, and “Save” simply does its job; you’ll just see the little “edited” dot next to the setlist title disappear when saving. If a newly created setlist hasn’t been saved yet, you’ll be prompted to enter a name.
The “Save as” button allows you save the current setlist under a new name – pretty standard…
Other Actions
The “Clear” button (5) simply clears the current setlist with no questions asked – no “are you sure?” here…
The “Print” button (9) creates a simple HTML file from your setlist in your “setlists” directory and opens it in your default browser. You can print from your browser or copy the table to an email to your fellow musicians – or even open the document in Word and add all sorts of fancy formatting.
Helpful tags
To make organizing my setlists easier, I created two special tags for my song files. You can also use them with LivePrompter – you can make LivePrompter show them using the “List Display” settings.
{energy: ...} is used to set the “energy level” of your songs on a scale from 1 to 10. You can sort your source files by energy level, which makes it easier to find high-energy or more relaxed songs for certain parts of your set list. How you define the energy level of your songs is entirely up to you 😉.
Also, SetlistBuilder will calculate energy averages for your individual sets (if you have defined any), which can be helpful when trying to build setlists with similar energy levels across sets – or maybe steadily increasing energy across multiple sets?
{color: ...} allows you to color-code your song list; songs can be shown with a different color background instead of just plain white. I use this to differentiate which songs are sung by which lead singer in our band, so I can see at a glance which one of us is getting bored during a set list. But feel free to come up with your own use for this feature.

Valid colors are:
- R: red
- G: green
- B: blue
- Y: yellow
- P: purple
- C: cyan
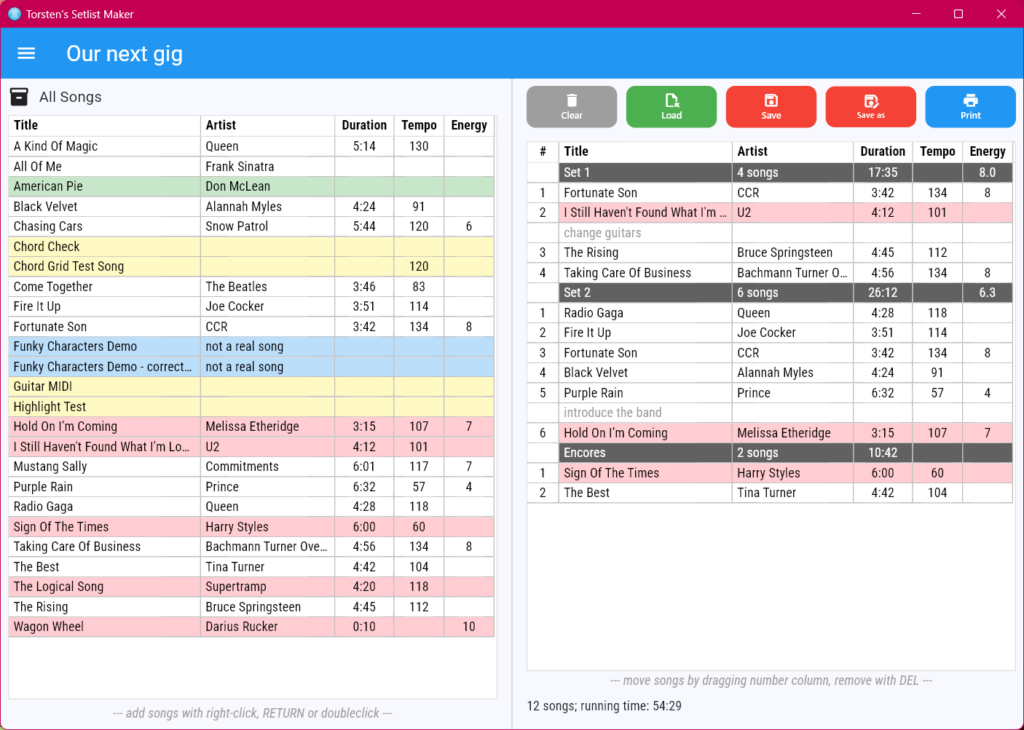
If you want take a “cleaner” look at your content or create a clean list using “Print”, you can temporarily disable the colors using the corresponding button in the “Drawer” – see the next section.
The Drawer
The Drawer is a small menu that pops out when you hit the “hamburger menu” button at the top left:

“Hide Colors” allows you to switch to an all-white background – useful for printing out the setlist for someone who isn’t interested in you internal color-coding.
“Refresh Data”: since Setlist Maker keeps all your song and setlist data in memory (in order to keep things nice and snappy), it can’t know when you make changes to your song and setlist data directly (e.g. rename or delete a song / setlist). Use the “Refresh Data” button to make Setlist Maker re-read all your source data from your hard drive.
The “Sources” section allows to switch between different sources (i.e. locations for song files) if you have more than one defined.
The “Settings” button takes you (duh) to the settings page – see next!
The Settings Page

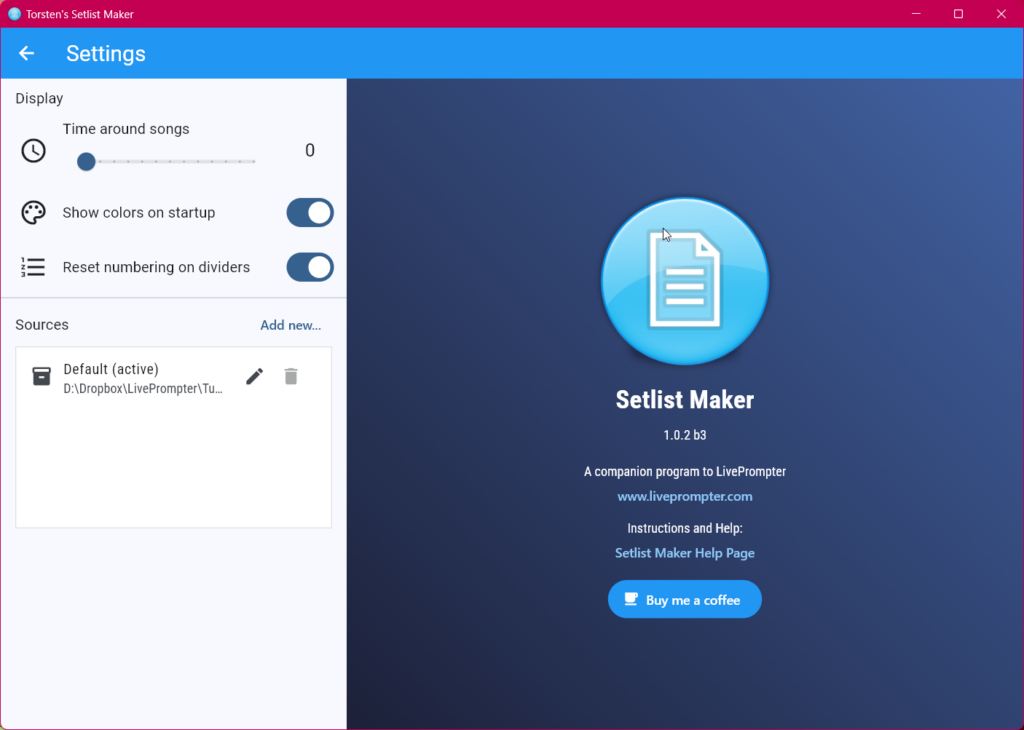
“Time around songs”: this makes calculating realistic times for your gigs easier. Bands rarely play songs “back to back”; typically, there is a bit of applause afterwards (hopefully!), plus some time for maybe introducing the song and a bit of banter with the audience. To account for this, you can define a time to add to the duration of each song (up to 120 seconds). This time will then be used to calculate the duration of sections shown in dividers and the total shown at the bottom of the setlist. If there is a time > 0 defined, Setlist Maker will also show the “net time” without this additional time:

By default, this time is set to 0.
“Show colors on startup”: if you want Setlist Maker to always start with color display disabled, you can set this setting to “off”. By default, it is set to “on”.
“Reset numbering on dividers”: by default, Setlist Maker re-starts song numbering after every divider. I have found this the more useful behavior, so it is active by default. But if you want to have numbers run through the whole list (as was the behavior of the old “Setlist Builder”, you can set this to “off”.
“Sources”: here you can manage locations for song files – see next section
On the right side of the screen, there’s the usual “About” page – you can use the links to get to this “help” page and to the LivePrompter homepage. And if you like the app, you can buy me a coffee 😉☕
Multiple configurations
If you use LivePrompter and SetlistBuilder for multiple projects like I do, you may want to use different LivePrompter directories for your project in order to keep things organized. Like LivePrompter, SetlistBuilder allows you to manage different “sources” (which is just a fancy name for different places where your respective song files live).
You manage your sources using the Sources section of the Settings page. You can add multiple sources, then switch between them using the Sources section of the Drawer.
Please note: since setlists are always specific to a source (because they refer to the song files within that source), there is no way to combine a setlist from multiple sources. Consequently, your setlist will be cleared when you switch sources.
LivePrompter will remember the selected source when you close the program.
That’s it! Let me know in the forum if something isn’t working right – and have fun using Setlist Maker!
